From Points to Token: A 3D Learning Log - Part 1
Deep Learning on 3D Point Clouds: PointNet and PointNet++
will be covering PointNet and PointNet++ in this first part of the series (idk how many parts will it take lmao, 3 more maybe but let's see how it goes)
PointNet
1.Motivation and Intuition:
The domain of computer vision was primarily dominated by the processing of regular, grid based data structures like images (composed of pixels). But in reality the physical world around is three dimensional - and with the use of 3D sensors in fields like robotics, autonomous mobility etc., we need to develop DL architectures for interpreting this 3D geometry. Now, we have enough data when it comes to 3D, but the problem does not lie in the availability of the data, but instead it lies in the representation of it. Unlike images which have a structured and a regular representation, 3D point clouds are inherently irregular, unordered and sparse.
1.1 Challenge of unstructured data
Point cloud data is a set of vectors P = {P1,P2,...Pn} where each Pi represents a coordinate (x y z). This representation presents many computational hurdles that the traditional CNNs cannot handle directly.
Permutation Invariance: Point cloud is a set, not a sequence. Set {A,B,C} is same as set {B,A,C}. Thus if we have a scan containing N number of points then the total number of possible permutations will be N!. So the model needs to treat all of these permutations as the same geometric object. Standard CNNs which rely on specific input or grid structures, fail to satisfy this invariance.
Transformation Invariance: The semantic classification of 3D objects should be invariant to the rigid transformations. For instance a chair, if rotated by 45 degrees, still remains a chair.
Sparsity and Volume: If we go with the volumetric approach we usually face this problem where the point clouds are converted into 3D grids and vast majority of these grids represent an empty space leading to inefficient memory usage and unnecessary compute.
1.2 Historical Context:
Volumetric CNNs: Transform points into occupancy grids. While intuitive it introduces quantization artifacts and high memory overhead.
Multi-View CNNs (MVCNN): Rendering 3D object into a collection of 2D images from various viewpoints and processing them with standard 2D CNNs. It obscures intrinsic 3D geometric relationships and complicates the task like 3D segmentation.
1.3 The PointNet Intuition:
PointNet Paper The core intuition of the architecture was to consume the raw point directly. It was designed in such a way that it treated each point individually and independently in the initial stages - extracting features for every geometric coordinate and then aggregating them using a symmetric function (Max Pooling) that eventually destroys the ordering information thereby achieving the permutation invariance. The design also ignores all the noise and learns to select the "critical points" that defines the skeletal shape of the object.
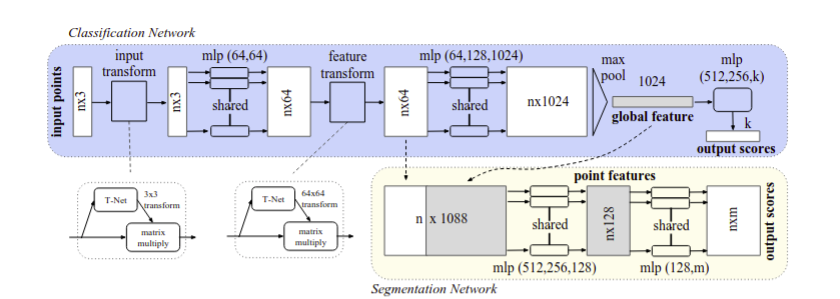
2. The PointNet Architecture:
So by now we have discussed the problem with point cloud data right? So if we feed a Conv2D network a shuffled image, it breaks. If we feed a MLP a shuffled feature vector, different shuffles will lead to different outputs! Which is actually really bad for us. By 2016, most researchers were using this idea in which they were converting the point clouds into voxel grids or multi-view images which kinda worked but made the representation 100x bigger. So ain't worth it.
2.1 Symmetric Functions:
What are symmetric functions?
A function is symmetric any change in the ordering of the input does not change the output. Simple example can be that of addition or multiplication or finding the mean of 2 or more than two numbers.
eg., a+b is same as b+a! No matter the order of the input the output will remain the same.
Why point clouds need symmetry?
Well point clouds are stored as sets and not sequences so if I have a point cloud describing an object as {(1,2,3),(4,5,6)}, it will be same as {(4,5,6),(1,2,3)}. The network must produce identical outputs for both orderings.
In the paper there are three strategies that are discussed to handle this.
Strategy 1: Sort into canonical order:
Idea: sort points by x, then by y and then finally by z before you feed them into the network.
Problem: in high dimensions, no stable sorting exists!
Why? it's simple, we want to project something that is in 3D into 1D while preserving all the distance relationships, which if you think about is practically impossible without distorting any distance!
Strategy 2: RNN with permutation augmentation:
Idea: treat points as a sequence and then train a RNN on many random orderings.
Problem:
- RNNs are order-dependent by design because they are specifically designed to process sequential data where the order of elements significantly influences the output.
Read more here
- Thousands of points will lead to a very long sequence and RNNs struggle with long sequences.
RNNs can be limited in their ability to process long sequences. This is because the gradients of the loss function can become very small or very large as they propagate through time, making it difficult for the RNN to learn long-term dependencies.
Above taken from article that can be found here
Strategy 3: Symmetric Functions - used in PointNet's architecture
Idea: Use a function that is inherently order variant - we saw that above - symmetric functions don't give a damn about the order of input! Irrespective of the order, the output remains the same.
2.2 PointNet's Solution: Equation 1
Breaking down the equation:
Left Side
- f is the target function we want to learn
- the input is a set of points : x1,x2......and so on
- output is a single value - a class label for classification
Right Side
Step 1:
- h is the shared MLP
- Each point is processed independently
- output is a K dimensional feature vector (typically K = 1024)
Step 2:
- g is the symmetric aggregator and it takes n feature vectors each of dimension K.
- outputs a single value
- must be symmetric: order of inputs does not matter
PointNet's choice for g is is :
MAX is element wise max across all n vectors and gamma is another small MLP that processes the pooled K vector to produce final output.
Example:
Imagine classifying a chair from 4 points: Input point cloud:
Step 1: Apply (shared MLP) to each point
Step 2: MAX pooling (element-wise across the 4 vectors)
Step 3: Apply (final MLP)
Chair has highest score (0.8) → Prediction: chair
Again,in simpler words, leaving all the maths behind the above equation is responsible for doing 2 things:
- Transform each point individually into a richer representation
- Combine all those representations in a way that ignores order
h(x) looks at each point individually - here a small MLP processes one point at a point and since x,y,z coordinates are not enough we need to extract features like whether the point is at an edge? or if it is part of a flat surface etc.
(x, y, z) → [64 numbers] → [128 numbers] → [1024 numbers]
These 1024 numbers are a "learned description" of what is interesting about the point.
The g(...) combines everything while ignoring the order. It is a symmetric function that merges all the individual point features into a single global description.
But why do we do this? well we have thousands of 1024-dim vectors (one per point) and we need to summarise them and for this we use 'max pooling' - take the element wise maximum across all the points.
Point 1's features: [2.1, 0.5, 3.7, 1.2, ...] Point 2's features: [1.8, 2.3, 1.2, 0.9, ...] Point 3's features: [3.5, 1.1, 2.9, 1.8, ...]
Global summary: [3.5, 2.3, 3.7, 1.8, ...] - max from each column
After max pooling: You have one 1024-dimensional vector that describes the entire shape, and this vector is identical no matter what order the points came in.
2.3 Local and Global Information Aggregation
After this step we are left with a vector which is a global signature of the input set.
The Problem:
Classification: Is this entire object a chair or a table? -> to understand this we need a global understanding of the shape and structure.
Segmentation: Which point belongs to leg of chair and which belong to seat of chair? for this we need both! global as well local understanding of the points.
So in nutshell:
Local info: What is the geometry around this point? Global info: What kind of object am I a part of?
The solution:
Feature Concatenation:
After computing the global point cloud feature vector, we feed it back to per point features by concatenating the global feature with each of the point features. Then we extract new per point features based on the combined point features - this time the per point feature is aware of both the local and global information.
Both global and local info alone is not good enough. why? because let us us say we only have local info about things - so a point from the leg of chair will be same to the point that will be of the leg of a table. To distinguish between them we need to have global understanding of the both. Also if we only have global info about something then we will only have info like "this entire object is a chair" without any understanding of the individual parts like seat or leg of chair.
The solution proposed in the paper was "concatenation".
A visual walkthrough will be like this:
before concatenation:
Point 1: [a₁, a₂, ..., a₆₄] ← 64-D local features Point 2: [b₁, b₂, ..., b₆₄] ← 64-D local features (different from Point 1) Point 3: [c₁, c₂, ..., c₆₄] ← 64-D local features (different from Points 1&2) ...
Global: [g₁, g₂, ..., g₁₀₂₄] ← 1024-D global features (same for all)
after concatenation: Point 1: [a₁, a₂, ..., a₆₄, g₁, g₂, ..., g₁₀₂₄] ← 1088-D combined Point 2: [b₁, b₂, ..., b₆₄, g₁, g₂, ..., g₁₀₂₄] ← 1088-D combined Point 3: [c₁, c₂, ..., c₆₄, g₁, g₂, ..., g₁₀₂₄] ← 1088-D combined
The Final Step: it involves using the combined features to be fed into a new MLP the get a set of new features of (128 -D).
Combined features (1088-D) → MLP → New features (128-D) → MLP → Part label
the final mlp learns the following:
- interpretation of local and global info
- extract relevant patterns
- make final per-point predictions
2.4 Joint Alignment Network;
let us say we have two objects (chair leg for instance) - one is upright (0,0,0) and the other is a bit rotated (0.7,0.7,0.7).
Problem: the network sees completely different numbers even though the geometric shape is exactly the same.
Three ways to handle this:
- Brute Force - data augmentation:
train the model on millions of chair images so that it is able to identify all sorts of chairs.
- Build rotation invariance into the network:
design such special layers that are able to guarantee that rotation does not matter!
but these are very hard and complex to design and the network has to memorise all sort of orientations for the same object.
- Predict the rotation first and then undo it -PointNet's solution
Before even processing, rotate all the inputs into a canonical orientation.
Part 1: Spatial Transfomer Network (T-Net)
Goal: No matter the orientation of the input chair, we will automatically rotate it to face forward before processing it any further.
How it works? well internally it has a mini architecture of the point net itself "mini PointNet" and it learns to predict " What rotation should I apply to make the object upright?"
Example:
- Input: Rotated Object
Point 1: (0.7, 0.7, 0.0) Point 2: (0.6, 0.8, 0.0) Point 3: (0.7, 0.7, 1.0) ...
- Transformation Matrix predicted by T-Net:
T = [0.707 -0.707 0] [0.707 0.707 0] [0 0 1]
- Apply the transformation to every point:
Point 1': T × [0.7, 0.7, 0.0]ᵀ = [0.0, 1.0, 0.0]ᵀ ← Now aligned! Point 2': T × [0.6, 0.8, 0.0]ᵀ = [-0.14, 1.0, 0.0]ᵀ Point 3': T × [0.7, 0.7, 1.0]ᵀ = [0.0, 1.0, 1.0]ᵀ
- Feed the aligned points to the main network.
How does T-Net learns?
T-Net doesn't know ahead of time what "upright" means. During training:
- T-Net predicts some transformation
- Transformed points go through the main network
- Main network makes a prediction ("chair")
- If prediction is wrong, both networks get corrected via backpropagation
- Over time, T-Net learns to align in a way that helps the main network succeed
Result: T-Net discovers a canonical orientation that makes classification easiest
Part 2: Feature Space Alignment:
Extension of the main problem - not only the coordinates need this alignment - but the internal feature representations might also need them! In other words, after the first MLP, each point has a 64-D feature vector and various features like "flatness in X direction", "curvature along y axis" etc., can be encoded in them .
Problem: If the input was rotated, then these features might also be rotated in 64 dimensional space right?
The solution to the above problem: Another T-Net but this time for the features!
Insert a second T-Net that predicts a 64×64 transformation matrix to align the feature space.
But this also gives rise to a new challenge! High Dimensionality.
Spatial T-Net:
- Predicts 3×3 matrix = 9 numbers
- Easy to optimize
Feature T-Net:
- Predicts 64×64 matrix = 4,096 numbers
- Much harder to optimize!
Problems that can occur:
- Matrix might learn to squash all features to zero
- Matrix might explode (make features infinitely large)
- Matrix might collapse dimensions (lose information)
- Training becomes unstable
Now to solve the above, the authors added a regularization term to the softmax training.
However, transformation matrix in the feature space has much higher dimension than the spatial transform matrix, which greatly increases the difficulty of optimization. We therefore add a regularization term to our softmax training loss.
Part 3: Orthogonal regularisation
Matrix A is orthogonal if:
where I is the identity matrix
So why orthogonal matrix? well because these are good! really good tbh!
- they preserve distances:
before transformation:
Point A: [1, 0] Point B: [0, 1] Distance: √2
after transformation:
Point A': [0, 1] Point B': [-1, 0] Distance: still √2 ✓
- the preserve informatoin:
these are reversible, we can always undo them. If we know the transformed data and the matrix we can recover the original data.
The Regularization Term:
A = the 64x64 term predicted by the T-Net I = identity matrix
the difference between identity and A.A^T
What does it measure?
If A is perfectly orthogonal:
If A is NOT orthogonal:
How it is used in training:
Total Loss Function :
the network tries to:
- classify shapes correctly - minimise the classfication loss
- keep the transformation matrix orthogonal - minimise the regularisation loss
example:
let A = [0 0 0 ...] [0 0 0 ...] [0 0 0 ...] ...
Result: All features become zero → Information destroyed!
AAᵀ = [0 0 0 ...] [0 0 0 ...] ...
regularisation penalty:
‖I - AAᵀ‖²_F = ‖I - 0‖²_F = very large!
The regularization penalizes this, pushing the network away from destructive transformations.
Good matrix:
A = [0.707 -0.707 0 ...] [0.707 0.707 0 ...] [0 0 1 ...] ...
AAᵀ ≈ I (very close to identity)
penalty:
‖I - AAᵀ‖²_F ≈ 0 ← Very small penalty
The regularization encourages this type of transformation.
Why This Works Stability Without regularization, the optimization can:
- Jump around wildly
- Get stuck in bad local minima
- Produce transformations that make training unstable
With regularization:
- The transformation stays well-behaved
- Gradients don't explode
- Training converges smoothly
Performance The paper states:
"We find that by adding the regularization term, the optimization becomes more stable and our model achieves better performance."
Why better performance?
- The network learns meaningful transformations (rotations/reflections)
- Information is preserved through the transformation
- The main network receives consistent, aligned features
PointNet++
to begin with let me try to put this new approach in the most basic terms possible:
PointNet++ = Hierarchical(PointNet(Local Neighborhoods))
The intuition: PointNet++ takes PointNet's core operation (feature learning + max pooling) and applies it recursively on local neighborhoods at multiple hierarchical levels, instead of once on the entire point cloud.
Method
Hierachial Point Set Feature Learning:
PointNet uses a single max pooling operation to aggregate the whole point set. It's like trying to understand a building by looking at every brick simultaneously, without noticing that bricks form walls, walls form rooms, and rooms form floors.
What PointNet++ does differently is that it builds its understanding in stages.
Think of it as if you are zooming out progressively:
- You start with all of the points that are available to you.
- Then focus on small areas/neighbourhoods and understand the details
- Zoom out, focus on medium regions, capture how these details continue
- Zoom out further, to understand the whole strcuture.
this is a three step understanding of the entire picture!
- sampling layer -pick the representatives:
From your 10,000 points, pick 1,000 points that are spread out well. These become centers of attention. Like choosing 1,000 spots on the chair where you'll look closely.
- grouping layer - find the neighbours
For each of those 1,000 centers, grab all points nearby (say, within 10cm radius). Now you have 1,000 small groups of points, each representing a local patch of the chair.
- PointNet Layer - understanding each group
Run mini-PointNet on each group separately. Each group of points becomes one feature vector. So 1,000 groups → 1,000 feature vectors.
Now you have 1,000 points with rich features (instead of 10,000 raw points). Repeat this process: sample 100 from those 1,000, group their neighbors, extract features. Keep going until you understand the whole object.
Robust Feature Learning under Non-Uniform Sampling Density
The basic problem of non-uniform density.
In basic terms, density is defined as the total number of points that exist in a given volume of space.
Usually density varies wildly across our point cloud data and cause non-uniform sampling.
Why this thing breaks regular PointNet++?
Well let us say we have a region with high density. Here PointNet can learn rich patterns. But when it comes to a sparse region only few points will be captured and thus PointNet can only observe noise and not patterns. Such features become unreliable.
One can argue that by simply changing the radius of the region that we want to observe we can get away with this problem.
Small radius - great for dense regions but at the same time terrible for sparse regions
Large radius - works in sparse regions but misses fine details in denser regions.
Thus by keeping a single fixed radius we cannot actually solve this problem.
 Solution 1: Multi-Scale Grouping (MSG)
Idea: Use multiple radii simultaneously and let the model figure out which one to use.
Apply PointNet to each scale independently
Then finally concatenate all of the features
During training the network will learn these weights through random dropout.
We train the network to learn an optimized strategy to combine the multi-scale features. This is done by randomly dropping out input points with a randomized probability for each instance, which we call random input dropout.
Solution 2: Multi-Resolution Grouping (MRG)
Why MRG? well MSG is pretty expensive - we are running the model on 3 different scales for every point - it means we are tripling the cost of computation.
How does MRG solve this? well it combines two information sources:
Hierarchial: Features from the previous abstraction level. This comes from processing smaller neighbourhoods recursively - good for dense regions.
Direct: Run PointNet directly on all the raw points in a larger neighbourhood.
This uses a bigger region and is well suited for sparse regions.
Let us understand the MRG with a concrete example that will make the maths behind it crystal clear!
Imagine processing a chair point cloud through a 3 level hierarchy:
Layer 0: 1024 raw points (just x, y, z coordinates)
Layer 1: Pick 256 important points. For each, look at nearby Layer 0 points, understand them with PointNet. Now you have 256 points with smart features.
Layer 2: Pick 64 important points. For each, we need to create features. This is where MRG comes in.
The Problem at Layer 2 Let's focus on one point at Layer 2. Call it Point A.
We need to give Point A a feature that describes what's around it. But there's a density problem:
Maybe Point A is on the chair seat (lots of points nearby) Maybe Point A is on a thin leg (very few points nearby) We need TWO different ways to look at Point A's neighborhood:
Path 1: Hierarchical Path (Look at Layer 1) Simple steps to follow:
Look around Point A Find which Layer 1 points are nearby Each Layer 1 point already has a feature vector which we computed earlier Collect those features and summarize them Example:
Point A is here: ★
Nearby Layer 1 points (already have features):
• Point B: "I see smooth surface, horizontal"
• Point C: "I see smooth surface, horizontal"
• Point D: "I see an edge connecting to something"
...
(10 such descriptions)
Summarize → "Mostly smooth horizontal surface with an edge"
Path 2: The Direct Path (Look at Layer 0) What we do is:
Look around Point A Find which Layer 0 raw points are nearby Run PointNet directly on those raw coordinates Get a feature Example:
Point A is here: ★
Nearby Layer 0 raw points (just coordinates): • (0.12, 0.45, 0.78) • (0.13, 0.46, 0.79) • (0.14, 0.47, 0.80) ... (80 such points)
PointNet looks at all 80 → "This is a flat surface"
Why Different Numbers of Points? Here's the key: Both paths look at the same radius around Point A (say, 0.4 meters), but they look at different layers.
Path 1 finds Layer 1 points within that radius → only 10 points (because Layer 1 is sparse—we sampled down from 1024 to 256 points)
Path 2 finds Layer 0 points within that radius → 80 points (because Layer 0 is dense—it has all 1024 original points)
Since we reduced the points by 4× when going from Layer 0 (1024 points) to Layer 1 (256 points), any given region naturally has about 4× fewer Layer 1 points than Layer 0 points.
Combining Both Paths
Point A now has TWO descriptions:
Path 1 (hierarchical): Summary from 10 Layer 1 neighbors
Path 2 (direct): Direct observation of 80 Layer 0 points
We glue them together: [Path 1 feature] + [Path 2 feature]
Why Two Paths? This approach actually solves the density problem we talked about earlier!
Path 1 - Hierarchical is GOOD when Point A is in a DENSE area:
Those 10 Layer 1 points were each created by looking at 50+ Layer 0 points.
They captured fine details like curves, edges, and textures
Their summary contains rich, detailed information
Path 2 - Direct is GOOD when Point A is in a SPARSE region:
Those 10 Layer 1 points were each created from only 5 Layer 0 points Their features are unreliable (not enough data)
Looking directly at 80 raw Layer 0 points gives more solid information
The network learns to automatically weight which path to trust more based on local point density!
Point Feature Propogation for Set Segmentation
Ok let's go back to our hierarchy:
Layer 0 : 1024 points - the original chair scan Layer 1 : 256 points - 256 sampled down points Layer 2 : 64 points - further sampled down Layer 3 : 1 point - global feature for the whole chair
Looking at the above hierarchy we can see that it will work absolutely fine for a "classification" task. But what about segmentation?
The problem is that we only have features for 64 points in our layer 2 and 1 point in layer 3. But we need features for all 1024 original points to carry out the segmentation task!
A brute force solution that you think of is that, why not have all 1024 pints at every layer? But think about it, this will be computationally expensive af. having 1024 points at each and every layer will defeat the entire purpose of hierarchical learning!
The Solution boys : Feature Propogation!
- Go UP the hierarchy normally (1024 -> 256 -> 64 -> 1) - learn all the high level features
- Go BACK DOWN (1 -> 64 -> 256 -> 1024) - thus spreading all the features to all the points.
Now how does it happen???
Step 1:
Layer 3 -> Layer 2 (1 point to 64 points)
We have one point at Layer 3 which has a feature vector. A naive approach to give this feature vector to layer 2 will be to just copy the features to all 64 points. The problem with this approach will be that each point will get an identical global information without any spatial variation! What do the authors do to solve this is that they use the feature but also keep the layer 2's own features (use of skip connections)
Step 2:
Now we have 64 points with features. We need to give features to 256 Layer 1 points.
The challenge here is that not every layer 1 point has a matching layer 2 point nearby. Or in other words - layer 2 only has 64 points, so it will be sparse as compared to layer 1 points which has 256 points which will be denser.
So the question arises of how a layer 1 point can get a feature when there is no layer 2 point at its exact location?
The solution is Interpolation!
Step 1: Interpolates features from the subsampled points to the original points using inverse distance weighting
where is the inverse weight distance.
Step 2:
After interpolation, point has a feature from Layer 2. But wait—point was already at Layer 1 during the upward pass! It already had features from looking at Layer 0 points.
Next thing to do: Concatenate both!
Interpolated feature from Layer 2: [0.8, 0.3, 0.5, ...] (128-dim) Original feature from Layer 1: [0.2, 0.7, 0.1, ...] (64-dim)
Combined: [0.8, 0.3, 0.5, ..., 0.2, 0.7, 0.1, ...] (192-dim)
After concatenation pass through "unit PointNet" (basically MLP applied to each point):
Input: 192-dim concatenated feature
↓ Fully connected layer + ReLU
↓ Fully connected layer + ReLU
↓ Fully connected layer + ReLU
Output: 128-dim refined feature
This approach allows PointNet++ to generate detailed segmentation maps that preserve both global context and local geometric details.
Why this works?
Interpolation ensures smooth spatial transition of features—nearby points get similar features.
Skip connections preserve fine details learned during the upward pass. Unit PointNet learns to optimally blend high-level context with low-level details.
The combination gives you the best of both worlds: global understanding from the hierarchy + local precision for every point.